Step 1: Documenting Every Step Of Your Existing 'Client Experience' Process
1.1 Bringing together the best of what you already have
OVERVIEW
The first step in the evolution of your new client process is to document each of the contact points that currently exist when you bring new people into your business. You will then compile, into one location, all of the material, notes and media that you use as part of your client touch points and communication such as emails, scripts, letters of engagement etc.
For ease of use and consistency we are going to use a spreadsheet in combination with a cloud-based document solution (Google Docs or Microsoft OneDrive) to bring this together … but more about that later!
You will find that as you progress you will recognise that things may not be entirely consistent or documented or will vary between the client professionals within your business. This is normal and we ask that you do your best not to shift into ‘fixing mode’ yet or into over-thinking what should go where. After all, our intent is to iterate and evolve what you have, to fix the gaps and improve the experience (but not yet). First you need to work out where you are already at and what you have available to work with.
As the foundation of your progress, you need a ‘best guess’ snapshot as to what takes place (or should take place) across the majority of your new client engagements. If there are slightly different steps for different situations, teams or professionals, then include each of the variants with notes (or create another spreadsheet/s to reflect more significant differences).
THE SPREADSHEET TEMPLATE
We are going to use a fairly basic spreadsheet template as the framework for this exercise. This spreadsheet is designed to be a guide template rather than an exhaustive list of options or a complete framework. We suggest that you stick to the columns we have created, however, you should feel free to create your own naming conventions for the touch-points / steps and the stages within which they fall.
The style of services you provide and the culture and history of your business will shape the exact nature of the process you go through and the material you use in your new client engagement system. Simply put, use the framework (headings and columns) but adjust the content, as what we have provided is intended as a sample only. You could use the example provided ONLY if matches your language and “culture”.
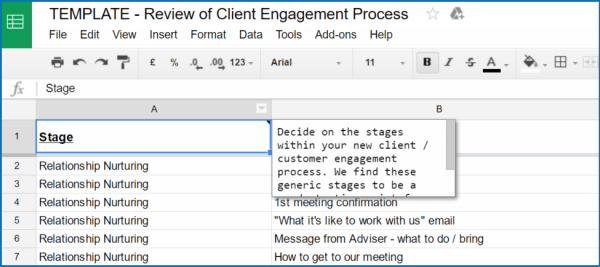
As demonstrated in the image, if you hover your mouse in each column’s heading cell, you will see that there are additional notes to assist your journey.


Some other columns you may wish to add as you progress through this process:
- Link to existing collateral / template / content (if available)
- Missing / required collateral / template / content
- Does the step involve client contact or is it internal?
- What kind of client contact is there? (In-Person / Video Call / Email / Phone / SMS / Post)
- Possible fears or Cognitive Dissonance? Client fears and/or uncertainties that need addressing?
- Is this client interaction “On Personality Brand”?
- Are we reinforcing our Value Hypothesis? i.e. Focusing on the ‘why’ & emotional trigger points
- Can we add ‘physicality’ to this step?
- Apps and/or technologies used in this step
- Which business divisions are involved?
- Does it currently require human input?
- Which people/roles currently perform this step?
- Can it be automated?
- Could we add video or other media to enhance/simplify this step?
- Is it currently completed in-house or outsourced?
- Can we outsource without sacrificing value/client experience?
- Which outsourcing team?
- Is there a mandatory compliance/audit trail requirement for this step?
LINKING YOUR MATERIAL / COLLATERAL TO THE SPREADSHEET
Once you have identified each of the steps in your existing ‘new client’ engagement experience, bring together all of the material that you have that makes up a part of this process.
You should consider but not limit yourself to:
- Email text
- Scripts for phone calls / training or support material for team members involved in the ‘new client’ experience (eg. receptionist, concierge etc)
- Fact and data gathering forms
- Questionnaires provided to client (physical or online)
- Checklists used by team members in the process
- Meeting guidelines / scripts / overviews
- Agendas, both client facing and internal
- Videos
- Hard copy material provided to clients (brochures, disclosure documents etc)
- Reports or clippings given to clients
- Photos of physical items used in the process (special reception lounge), coffee menus, props, TV’s, whiteboards etc
- Photos of reception area and offices where clients are hosted
- Photos of building entrance and transition points that clients experience such as lifts, hallways etc
- Guides or checklists sent to clients
- Engagement documents
- Physical letters sent to clients
- Report templates used during ‘new client’ engagement
- Links to articles or other online material shared with clients
- Links to digital assets and social media/online profiles for the business such as Facebook, LinkedIn, website etc (even if not directly shared with clients during the process – assume they have searched for them)
- Discussion / white papers
- Proposal documents
- Process for recording meetings
- File note templates / process
- Anything else you can think of that shapes what a new client currently experiences in your business
It is important that every one of these items can be stored online with a link that can be directly copied into your client experience spreadsheet. It is not enough that you know they exist or that they exist in a form that you cannot create a link to (a CRM etc). It is critical that you start your project free of obstacles and the right foundation and that means being able to link directly to your collateral within this spreadsheet time and time again.
This means that you may need to:
- Copy email templates that are within your CRM into a Google Doc / Word 365 document, so that the text is editable within that document. Where possible preserve the formatting / layout. It would also be a good idea to take a screen snip showing what the email actually looks like (as a client will see it and paste it into your document).
- Do the same as above for all of the written text your clients receive as part of their onboarding, whether in hard or soft copy.
- You can either link directly to photos or copy them into your Google Doc or Word 365 as an easy way to create a gallery.
- Include links to any YouTube or Vimeo videos you use as part of the process.
- Make sure to remove individual private client details from any template examples as you will want to be able to share these and seek input during the iteration stages. (Although there is no compulsory need for you to share these files if you believe they are of a proprietary nature and you feel this outweighs the benefit of gaining external input and advice during your revisions.)
Once you have completed this process paste all of the relevant links to your collateral into your spreadsheet so that you can see what material is available at each touch point for new clients.
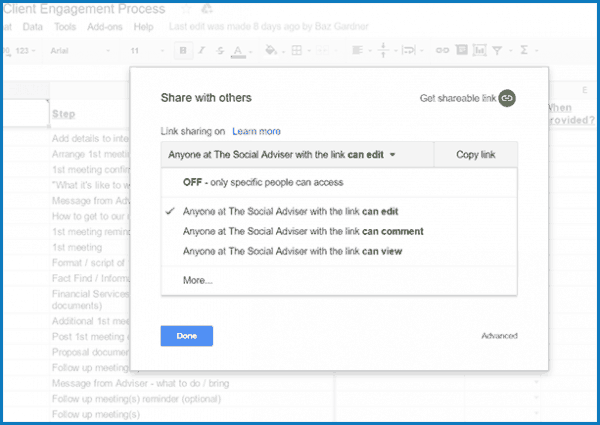
You should also ensure that you have selected the relevant privacy / share status for each of these items as fits your needs.
<<< This image shows some of the sharing options available for Google Sheets.
If there any any proprietary documents that you do not wish to share outside of your own team you can simply set these to reflect this. However we encourage you to set as much of the content as possible to ‘anyone with the link can view’ so that you can seek feedback from our team and your peers throughout the iteration process.
We find this philosophy will create results far in excess of any perceived risk you may hold for sharing your systems within what is a limited forum. However there are also cases where you are restricted from sharing items and we trust that you will know when they are and set your sharing status accordingly.
By going through this process now it will make it far easier later for you to edit, maintain version control of edits (one version which is tracked online), share your spreadsheet with us and your peers for input (but still retain confidentiality where required) and most importantly find, prioritize and iterate quickly in the later stages of this project.
Ok, time to get to work!

1.2 Completing the ‘What we think we need to add’ steps
As you have been completing the gathering process outlined in step 1.1, you will likely have also been coming up with ideas for additional steps or refinements to your existing engagement protocols.
Now is the time to compile your notes / thinking and to insert any steps you are considering adding into the spreadsheet. If you have ideas on how to improve your existing material then make sure to add the notes into the spreadsheet. If you require more detailed notes or are working on new variants that are not yet ready to replace the existing ones, then simply create a Google Doc for example and provide the shareable link within your spreadsheet.
For any new steps you are considering adding to your process, create a new line and add your notes and links to any working material. As this is not yet a step that exists, we suggest that you fill the line in your sheet as a different colour to denote that it is a planned rather than existing step.
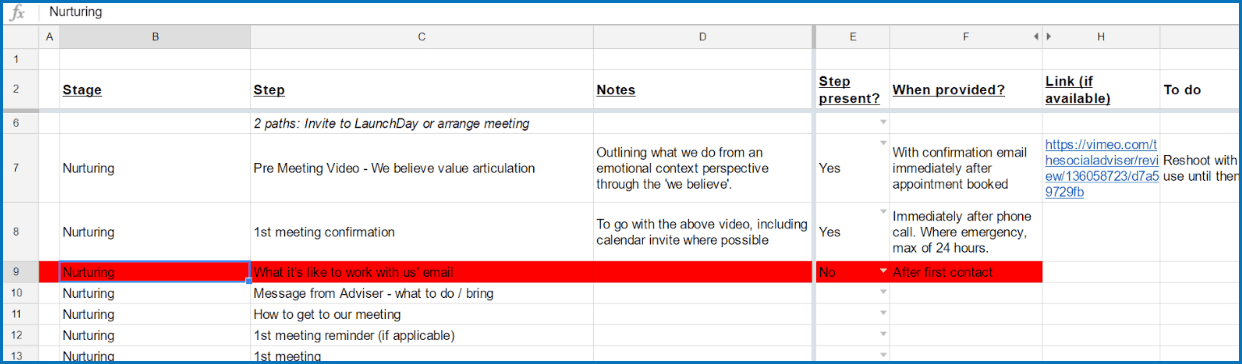
You can see in the example above we have added a potential step to our process; an email we have titled ‘What it’s like to work with us’.
DON’T START CREATING YET
It’s exciting to see the many ways that you can now be improving your existing ‘new client’ experience, however, we would encourage you not to spend too much time just yet on building your new process. To create the best iteration in the shortest amount of time requires a methodical process; rather than rushing at things piecemeal we are going to work through a few more steps before we start moving into the creation stages.